Up until now I have posted recipes and crafts for the home or yourself. But being creative is more than just cooking and crafting. In my opinion, music is a way to express your creative side as well. I love getting new instruments and dabbling with them to make new music. There is a sense of wonder and excitement that fills me when I pick up a new instrument that I have never played before.
The first instrument I ever played was a piano. I remember it was in fifth grade and I wanted to join the school band. I was especially interested in the clarinet. My mother told me if I faithfully practice on the piano for two weeks straight that she would let me join band. She wanted me to be aware of the work it would take to learn a new instrument. I eagerly accepted the deal, but by the fourth day I was bored of the piano and didn't want to practice anymore. Even at a young age I realized that committing to something takes hard work. I lost interest in band and a few years passed before I picked up my next instrument: a guitar. It didn't take long for me to realize that I enjoyed the guitar more. My mother, who had played for years herself, taught me a few tips and tricks and from their I taught myself.
I have been playing guitar for 6+ years and in that time I have helped lead the youth worship team and played in the adult worship team at my church, and given a handful of people lessons. One of the girls I taught guitar now actually leads the youth worship team that I used to lead. I am still learning so much, but I am also finding that if I explain something I learn (usually to my husband), it sticks much faster than if I just learn it and never have to vocalize it. Which brings me to this crash course.
Watching people learn how to play and seeing the joy on their faces is a wonderful thing. Although I most likely won't be able to see any of you learn, I can still hope that these lessons will help get you in the right direction. On the flip side, teaching you how to play is going to force me to learn more on the instrument and grow as a musician. I am very eager to get started and hope you are too!
Guitar: A Crash Course For Beginners
In this crash course, we will go over very basic principles on the guitar, such as part names, notes, types of guitars, etc. I do plan to do a more in depth study, but that will be another day.
Types of Guitars:
There are many types of guitars. A few of the more common are the acoustic, the electric, and the resonator. Each can be played the same way and each have their own unique quirks. The acoustic gives a lovely, versatile sound that can be played in almost any setting. The electric can have a lovely melody to it and can also be played with more rock music. The resonator give a much more bluesy sound that sounds great, especially in blue grass. For this crash course, we will be focusing on the acoustic guitar.
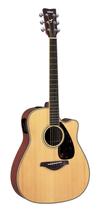 Acoustic | 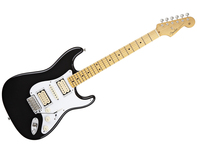 Electric | 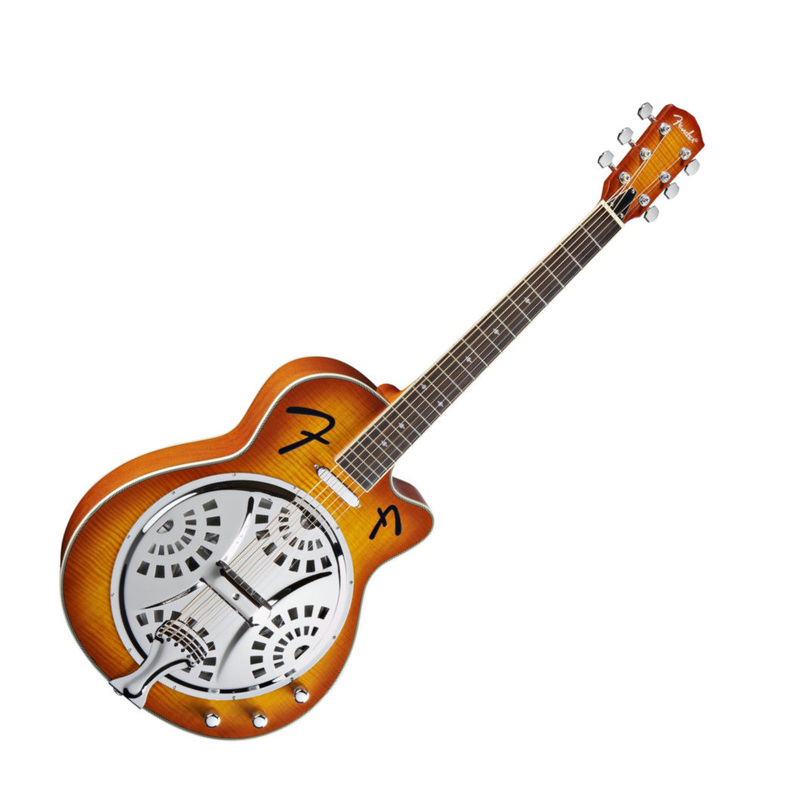 Resonator |
Parts of a Guitar:
Before you begin playing, you need to know your instrument. If I asked you to tighten the keys, or dust off the bridge would you know what I was asking? Knowing your guitar is as important as knowing your car (Well, not really, but you get the point). Here is a lovely diagram I found that gives you the basics:
Before you begin playing, you need to know your instrument. If I asked you to tighten the keys, or dust off the bridge would you know what I was asking? Knowing your guitar is as important as knowing your car (Well, not really, but you get the point). Here is a lovely diagram I found that gives you the basics:
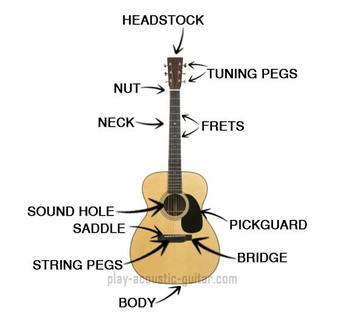
Now to explain each a little better.
HEADSTOCK: Also known as the head of the guitar, it is found at the end of the neck. This is where the tuning pegs are located.
TUNING PEGS: Also known as the keys, these are what tune your guitar. Tighten the keys, the string sounds higher, loosen them and it sounds lower.
NUT: This is where the head and the neck meet. Each of the six strings have their own little groove in the nut that keeps them in place and helps hold the tension.
NECK: That is the long, skinny part of the guitar. You play all of the chords and notes on the neck. If you are right handed, your left hand will be on the neck; if you are left handed, your right hand will be on the neck.
FRETS: These are all the spaces between the little metal bits going down the neck. Putting your fingers in those spaces gives a different sound depending on which fret you are in. The little metal bits are called fret-wires. The space between the nut and the first fret-wire is the first fret, after that first fret-wire is the second fret and so on. If you notice (I know it is hard to see in this picture) there are little white dots on frets 3, 5, 7, 9, 12, 15, and 17. these are position markers and come in very handy when you start playing further down the neck. There are also little dots on the side of the neck so you don't have to bend way over to see them on the neck face.
BODY: This is not in the diagram above, but it basically the name for the rest of the guitar. The face is the top part that has the pick guard, bridge and sound hole on it and the back is, well, the back.
SOUND HOLE: This is where all the beautiful music comes out of! This is also about where you want to strum. Not everyone strums right there, but as a beginner it is best to stay in that area until you are more familiar with it. Some guitars have different shaped sound holes and some are even in completely different places. The picture above gives the most common type, but there are others out there.
PICK GUARD: This is to protect your guitar while you are playing. When you use a pick, it is very common to continue down the guitar a bit before picking your hand back up. The pick guard is there to keep you from wearing a hole in your guitar. I played a guitar for a while that didn't have a pick guard on it and I ended up wearing a nice gouge in it.
BRIDGE: This is where the strings are held in place. It is usually darker than the guitar body and raised slightly from the face of the guitar. Some bridges use the pegs (as shown above) that are pushed down to hold the strings inside using the tension they give. Other less common bridges don't use the pegs and instead have six holes to put the strings though to hold them that way.
SADDLE: This is the small, angled, white, plastic strip on the bridge. Like the nut, it also has six grooves in it for the strings to rest on and helps hold tension on them.
STRING PEGS: Also called bridge pegs, or just pegs. These are what keep the strings from flying out while you play them. They are designed to hold tension in a way that the tighter the string is pulled, the stronger in place they stay.
Learning Notes:
Knowing the individual notes on the guitar is crucial if you want to go as far as you can with the instrument. The musical alphabet is something to memorize, and the best part is that it is the same for every single instrument! If you are familiar with the piano at all you will most likely know these, but I will not assume that you are. The musical alphabet goes:
A, A#/Bb, B, C, C#/Db, D, D#/Eb, E, F, F#/Gb, G, G#/Ab
The A#/Bb and so on is the same note, just different names for it. Most of the time you will see it written as a sharp (#) instead of a flat (b) but it is good to know both. Now with that information added to your folder of knowledge we move on to the notes on the guitar. There are six strings on the guitar;
E, A, D, G, B, e
No, that last 'e' is not a typo. Because of there being two E strings on the guitar, the sixth string, or the high E, is lowercase when listed with the rest of the notes. The strings are listed from top to bottom, or lowest-pitched string to highest-pitched string. An easy way to memorize these notes is by remembering Elephants And Dogs Got Big Ears. Not the most grammatically correct, but it is catchy.
When you pluck the top string, the low 'E', you are plucking an 'E' note. when you pluck the second string you are plucking an 'A' note, and so on. You implement the musical alphabet when you begin playing on the neck of the guitar and pressing down on the strings in different frets. For example: Pluck the top string and you have an 'E' chord. Push down on the top string in that first fret and pluck, and now you have played an 'F'. Move on to the second fret and it becomes an 'F#' and so on. Same with the other strings. Start on the open 'D' string and move down the fret board and you go in order of 'D', 'D#', 'E', 'F', and so on.
Reading Chords:
Chords are how the majority of guitarists read music. Chords are when you play multiple notes on the fret board at once to make one complimentary sound. An example of reading chords is like this:
D G D
Amazing Grace, how sweet the sound,
A7
That saved a wretch like me.
D G D
I once was lost, but now I'm found,
A7 D
Was blind, but now I see.
I have the chords in bold print so they stick out a bit more. Here we have the iconic chorus to Amazing Grace. When reading this, you see that you strum the D chord while singing "Amazing Grace how" and then switch to the G chord for "sweet the" and then back to D for "sound" then continue strumming D until you get to the end of the second line where you switch to A7. You will gradually get better at learning the rhythm of the song and switching back and forth between chords with practice.
Most all chords are explained in a diagram similar to the one below. At the top you see that we are looking at the G chord. Below that are the notes of the strings of the guitar (EADGBe). The thick black line right below those represents the nut on the guitar (look at the diagram above to remember what and where the nut is.) Then you have your first four frets. The black dots with the numbers in them represent your fingers, 1 being the index finger, 2 the middle finger, 3 the ring finger, and four (not shown) the pinky finger. This diagram is shown as if you were holding your guitar upright in front of you with the strings facing you.

Strumming:
There are multiple different types of strumming patterns, unfortunately, I was not taught any of them. I learned how to strum on my own and it came quite naturally to me, making it increasingly difficult to teach to others. At this point in my knowledge (I will update this if I find a more effective way to verbalize what I know) the best I can tell you is to start by strumming down on the beat. So if you listen to the song, the beat you would clap along to is the same beat that you would strum to. Do this until you are comfortable and then throw in an up strum here and there. Play around with it, have fun! Listen to the song to see if you can mimic the strum pattern, some are quite easy to play. Hopefully in the future I will be able to post a video to help explain, but for now the best I can do is to encourage you to experiment with the strumming, going down only, or maybe down then up then down then up, or you may even find a strum pattern you really like that you can't quite explain what you are doing. There is really no wrong way, it lets you grow as a player!
Accessories:
There are all sorts of wonderful things you can get for your guitar, but there are a few you really should have when getting started: a tuner, a metronome, and picks.
TUNER: In order to learn any music by ear, you need to be sure that the instrument you are practicing on is in tune. Do a little research and read reviews to see what kind of guitar tuner you would like to get. I have used multiple types and they all work fine, especially for a beginner. When you use it, you will pluck the first string (E) and the tuner will recognize it and tell you what the tune is at. A little needle will start hopping around. Somewhere on the screen will show what note it is. Make sure you are getting it to show E (you may need to tighten or loosen your strings, depending what it shows, so remember your musical alphabet!) the adjust the key until you get that needle to the middle. Some tuners have lights that will blink red until the note is right then they will blink green. It may take some practice, but you will get the hang of it. A VERY IMPORTANT NOTE: When tuning make sure you are tightening/loosening the right string! You may be plucking one string but adjusting a different one without realizing it. This could cause you to tighten a string too much and break it.
METRONOME: You don't realize how easy it is to keep a steady beat until you play with a metronome. You get into a song and you start speeding up without realizing it or a slower part of the song comes and you slow down too much. Having a metronome will help you keep the right tempo while you play. It is also handy to have when you are learning a song. You can slow the tempo down and play along with that and speed it up as you improve.
PICKS: Go to a music store and fiddle with some guitar picks. Get a couple of each kind of gauge (thickness) and play with them until you find the ones you like best. Usually, a thicker, or stiffer, pick is used for electric guitar, but some people enjoy using them for acoustic as well. I use a smaller gauge and really like it. It is purely a preference thing. Not using a pick and strumming with the side of your thumb will lead to a callous, which isn't a bad thing, but you may not want to have a hard callous on the side of your thumb.
FURTHER LEARNING:
If you are wanting to learn lots of different songs, ultimate-guitar.com is a great website to go to. I use it all the time and thoroughly enjoy it! You can also search more tutorials on youtube.com or google.com. I hope to in the future post a more advanced guitar tutorial, but this will get you started! Happy playing!
 RSS Feed
